Google Analytics 4 which was once a very sophisticated option available only for tech giants have now been made simple and available to all the webmasters. The stats and analytics options are available even for blog writers on free platforms now.
Google Analytics is the most widely used and a free analytics solution available that you can leverage to the fullest in order to understand what is happening in your online store, how users are interacting with the website and what they are upto, demographic information of your site users, etc. It is loaded with many many features that provide you completed analytics solution for your website. And the best part, its a service offered by Google and hence you can trust on its quality.
In this article we would be setting an Google analytics account and integrate the same with Magento 2 for enabling some real time tracking for your website.
Configure Up Google Analytics Account:
1. Search for “Google Analytics” in Google search and the first link would take you to the analytics login page.
2. Login using your Google account.
3. You will be displayed with a page similar to the below screen. Click on the “Sign Up” button:

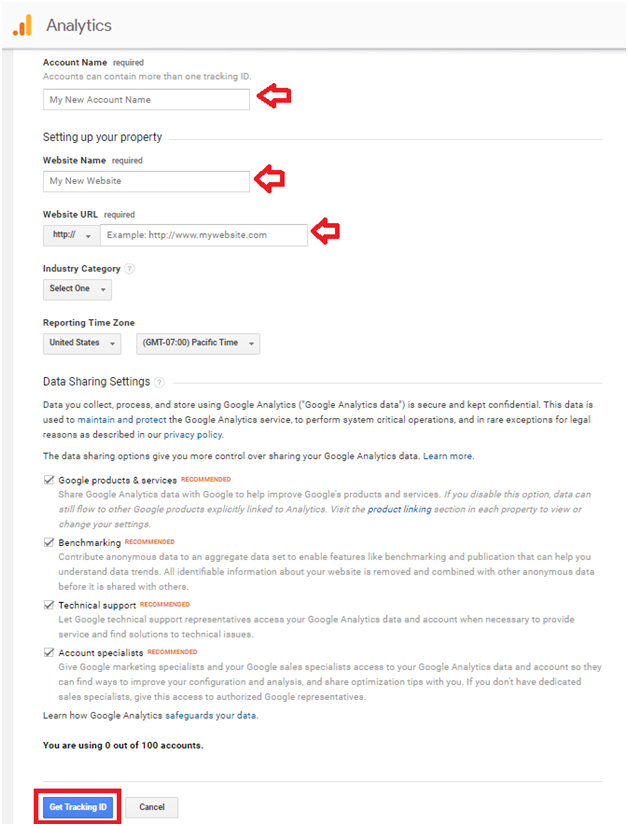
4. You will be prompted to enter your Magento websites details like Account Name, Website Name, Website URL, Industry related to the products that you are selling, Time zone in which you want the reports to be produced, etc.

5. Once you have filled up the necessary details, just tap on the “Get Tracking ID” button.
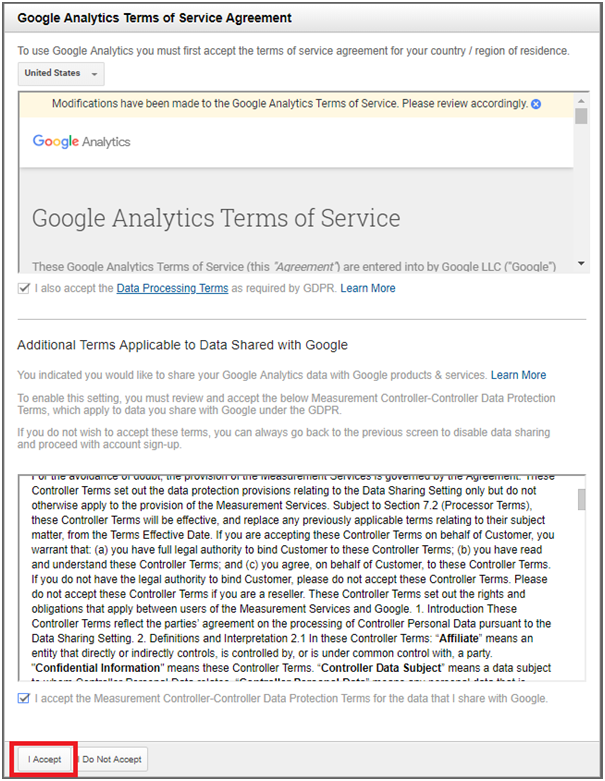
6. Upon clicking the “Get Tracking ID” button, it would display a popup with the Google Analytics Terms and Conditions. Once you have gone through their Terms and Conditions, click on the check boxes and click on the “I Accept” button.

7. Your Google Analytics account will be created and you will be displayed with a Tracking Code information page. Just copy the Tracking ID to a notepad or an editor of your choice.

Configuring Google Analytics in Magento:
1. Login to Magento 2 Admin Panel.
2. Navigate to Stores -> Settings -> Configuration -> Sales -> Google API.

3. Click on the Google Analytics group to open it. Set the Enable value to Yes and specify the Tracking ID that you copied from Google Analytics in the Account Number text field. Click on the Save Config button.

4. Now that we have Google Analytics account configured in the Magento, login to the Google Analytics dashboard and click on the Overview menu item under the Reports -> REAL-TIME section.

5. You would start to see statistics and demographic information of your site visitors.

By following this guide, you can successfully configure Google Analytics in Magento 2 and start tracking your store’s performance. Monitoring and analyzing the data will help you make data-driven decisions to grow your business. If you encounter any issues, please reach our Magento developers or visit our website for more info.
